This second article in the series introduces us to the basic features of the GIMP, a Linux power tool for the graphics artist.
Last month, in the first of this four-part series on the GIMP, we took a quick tour around the GIMP’s installation and system requirements. This month we’ll cover a few basics about how the GIMP works, which types are included and how they are used, and a bit about supported file formats. This information is somewhat condensed, and you may wish to read through it once, then read it again as you begin playing with the GIMP and its windows.
How Does the GIMP work?
The GIMP is a raster graphics tool, meaning that it operates on images as collections of individual points called pixels. Each pixel is made up of a number of channels. The number of channels depends on the image type being processed. For example, RGB (and RGBA) images consist of four channels, one each for levels of Red, Green and Blue and one called the Alpha channel which is used to determine the transparency for a pixel. Transparency for individual pixels becomes important when working with layers. Layers are a feature of the GIMP which permit an artist to create pieces of an image separately; the pieces can be manipulated on their own without affecting the rest of the image. This is useful, for example, when creating cover art for a magazine or CD. The image on the cover of the November issue of Linux Journal had many layers. The text for the word “Graphics” is made up of 4 layers, each combined with the layer below in a different way to create the final 3D effect. We’ll talk about layers in more depth next month, when we cover the Image Window in Part 3 of this series.
The GIMP supports three types of image formats: RGBA, Grayscale and Indexed. RGBA was described in the previous paragraph. RGB images are just like RGBA except they do not contain an Alpha channel. Grayscale images are similar to RGBA images except they only function with one channel—Gray—that allows varying levels of gray from black to white. Indexed images use a color palette to determine which colors are available, and each pixel’s color is represented by an index value into that palette. For example, a value of 112 for a pixel means that the pixel will be the color specified by the 112th entry in the color palette. Each channel of an RGBA image uses 8 bits, allowing for 256 shades of each channel’s color or transparency level. The grayscale channel uses 24 bits, supplying about 16 million shades of gray. Indexed images use 8 bits to define the color palette index, meaning a color palette consists of 256 unique colors.
Most processing work should be done in RGB (note that the GIMP usually refers to RGBA simply as RGB) or Grayscale modes to allow greater flexibility. Some image file formats, most notably the GIF format, save images as indexed images. If you open a GIF file for processing with the GIMP, you should consider first converting it to RGB. Afterwards, if a GIF file is required (say, for use on a web page), you can convert the image back to indexed. Conversion of image formats from within the GIMP is done using the Image Window menus, which we’ll discuss at length next month.
GIMP Windows
When you start the GIMP, you’ll find it provides a single, small window with a set of buttons, called the Toolbox. The Toolbox is the starting point for creating images and is made up of a menu bar, the tool buttons and the foreground/background color block. If you are familiar with Adobe Photoshop then the look and feel of the Toolbox should be quite familiar to you. Figure 1 shows the default Toolbox configuration.

The GIMP provides a number of other windows with which you should become familiar. The first is the Image Window, in which an image is displayed. There can be more than one of these windows open at a time. You can open the default Image Window by placing the cursor over the Toolbox and typing ctrl-N (N is for New Window). A small dialog box will open that allows you to specify some parameters for this new window. Accept the defaults for now so that you can see an example Image Window. These windows display an image as it will look in its final form based upon the layers that are currently marked as visible. Image Windows are resizeable and scrollable. It is possible, through the use of zooming features, to have an image that is larger than the display area of an Image Window as well as an image which is smaller than the display area.
Image Windows are made up of a number of smaller window features: rulers, menus and scrollbars. The rulers, along with their guides, provide a convenient method for determining location and size of areas of the image. All image windows have rulers on the left and top sides of the window, although these can be turned off using one of the pop-down menus.
The pop-down menus in the Image Window are not obvious—you have to hold down the right mouse button while the cursor is in the Image Window to open the menus (opening a menu is also known as “posting” the menu). These menus contain a wealth of options for viewing, selecting and manipulating the image. While many of the options are available directly from the Toolbox, many others, like the plug-in filters, are only directly accessible from pop-down menus. You’ll probably want to familiarize yourself with the layout of these menus, since you’ll be using them quite often.
The scrollbars appear on the right side and the bottom of the Image Window. They are used to move the image around the display area when the full image cannot be displayed within the current width and height of the window.
Dialog Windows

Along with Image Windows, users will find that they interact repeatedly with various dialog windows. These windows open and close based on user input. For example, selecting New from the File menu in the Toolbox opens the dialog for creating a new Image Window. Most filters (features which manipulate all or part of an image) use dialogs to allow specifying parameters. Some dialogs require user action to close them; others are informational only and close automatically when they finish their work. An example of an informational dialog is the dialog box that shows the status of a filter operation. This dialog shows a scale that fills from left to right to represent the amount of the selected area that has been filtered.
There are a number of dialogs in the GIMP; a list of these dialogs is in the “Dialog Windows” box.
Dialog Windows
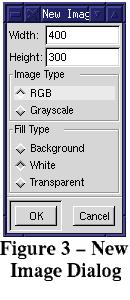
New/Open: Create a new image window of specified dimensions, image type (color or grayscale) and initial fill type (white, background or transparent), or open an existing image in one of the supported file formats.
Preferences: Set the number of levels of undo and the type of background used to signify transparent regions of an image.
Tool Options: Each tool available from the Toolbox has a Tool Options dialog that allows the user to select configurable parameters for the given tool. This window is opened by double clicking the tool icon in the Toolbox. Not all tools have configurable options, so for some tools this dialog simply states that there are no configurable options.
Brushes: Allows the selection of a brush type for use with the paintbrush, pencil and eraser tools.
Patterns: Allows selection of a pattern to be used with the Bucket tool when the bucket-fill type is set to Pattern Fill.
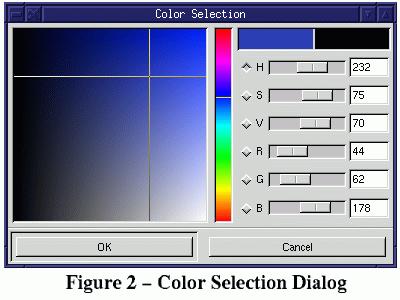
Color Palette: Allows selection of colors for various tools and processing filters. The Color Selection dialog, shown in Figure 2, permits the selection of colors through the use of a color wheel or slider values.
Layers and Channels: Allows selection and manipulation (move, delete, add, scale, merge, etc.) of layers and provides access to the individual channels for the current image.
Gradient Editor: Permits the creation, modification, use and deletion of gradients. Gradients are used with the Gradient tool that is selectable from the Toolbox.
Cursors
The GIMP uses a number of different cursors to identify what can be done in different portions of the image when using different tools. A cross-hair cursor is used by the Selection tools. This cursor is also used by the Color Picker, Bucket and Blend tools. A double-crosshair is used by the Crop tool. A pair of curved, point-to-tail arrows is used for the Transform tool. A two-pointed arrow (arrowheads on both ends) is used for the Flip tool. The Text tool uses the traditional I-beam cursor. The Move tool uses two two-pointed arrows, one pointing left/right and one pointing up/down. All other tools use a pencil cursor.
The cursor type also depends on whether a section of the image has been selected or not. For example, if a section of the image has been selected, and the cursor is placed over that selection then the cursor looks like the Move tool cursor. This is because the Selection tools permit a selected area to be moved without having to change tools to the Move tool. Note that only the selection moves—the non-selected region stays where it is. For many of the tools the cursor will be the traditional diagonal arrow over the image until the cursor is moved into a selected region. It takes a little work to become familiar with the currently active function based on the look of the cursor, but once you’ve worked with the GIMP for a short time they will become second nature to recognize.
Opening/Saving Files
Now that we’ve introduced the basic layout of the application we can start to look in depth. Beginning with file input and output, you have the option of starting with a blank new image or opening an existing image. In either case, you select the File pull-down menu from the Toolbox’s menu bar. In this menu you’ll find 5 options: New, Open, About…, Preferences and Quit. The About… option opens a little window that gives credit to the authors of various pieces of the GIMP. The Preferences option is used to set the visual cues used for transparent regions of images as well as the number of levels of undo. Keep in mind that setting higher levels of undo can use up significant amounts of memory. Changes to this setting are applicable to the current session only—they are not saved between GIMP sessions. There is an undo level option in the gimprc file, if you wish to make permanent changes. Finally, the Quit option does the obvious—it exits the program.
The New option opens a dialog that allows the user to select the dimensions of a new Image Window. The image type (RGB or grayscale) and the type of background to use are also selectable. Figure 3 shows the New Image dialog box. As with many options in the GIMP, you can also open a new window using keyboard accelerators. For a new Image Window, place the cursor over any GIMP window and type ctrl-N.

Opening an existing image is similar to opening a new Image Window. The dialog box presented is the File Selection dialog, which enables you to change directories and select individual files for opening. If you’ve ever used a Motif or Windows-based application, you will be familiar with the way the File Selection window is used. Like the New option, the Open option can be accessed through the keyboard. Place the cursor over any GIMP window and type ctrl-O to open an existing image.
Supported File Formats
In order to open an existing image, you must be familiar with the file formats supported by the GIMP. Raster images can be saved in a large variety of formats, each suitable for various functions. The GIMP supports all of the more popular formats such as GIF, JPEG and TIFF, and a few lesser-known formats. The GIMP Plug-In API, a programming interface allowing users to add extensions to the GIMP, enables the list of supported formats to be extended. All that is necessary is for a user to write a plug-in to handle the reading and writing of the new format.
The list of raster formats supported in the default distribution for reading and writing includes those shown in the “Raster Formats” box.
Raster Formats Supported by the GIMP
The list of raster formats supported in the default distribution for reading and writing includes the following:
- GIF
- HRZ (a format for amateur radio slow-scan TV)
- JPEG
- PCX
- PNM
- SUNRAS
- TIFF
- XWD
Note that with the exception of PostScript, the GIMP only supports raster images. An alternative to this format is known as vector format images. These images are commonly used on Microsoft systems and carry the .wmf suffix. If you have or need to use these (you can find icons in this format on many CDs available from software stores), you should consider using Applixware’s Applix Graphics tool. This program can import the .wmf files and export them in a number of raster formats which can be used by the GIMP. (Applixware is a commercial package.)
PostScript output is used in conjunction with a Print Plug-In. This plug-in is not in my distribution, but it will most likely be part of the basic package by the time this article reaches the newsstand.
Four GIMP-specific formats are also supported—GBR, HEADER, PAT and XCF. GBR is the format used for brushes, so that you can create a simple image and save it as a new brush quite easily. The HEADER format is used internally for the buttons in the Toolbox. PAT files hold the patterns used for Bucket Fills and other fill operations. XCF is the format used to save layer information. While you are working on an image, you should periodically save it as an XCF image so that, if necessary, you can load it again in the future with all the layer information intact.
Saving images can be a little complicated. For example, if you try to save an image as a TIFF file you might find that only part of the image gets saved. When specifying any format other than XCF, the GIMP will save only the currently active layer unless you flatten or merge the visible layers of the image. If you save the image using the XCF format (even without first flattening or merging the layers), all of the layers will be saved. The moral here is simple—save your images frequently as XCF files, and you won’t lose any data.
Some file formats are meaningful only with certain image formats. An RGB image contains more information about an image than the GIF format holds, so RGB images cannot be saved in the GIF format. If you wish to save the image as a GIF, the image must first be converted to an indexed format. To accomplish this, flatten the layers (done via the Image menu’s layers->flatten option), click the right mouse button over the image to drop down the image menus and select image->indexed. The image is converted and is now ready to save as a GIF file. Note that converting from RGB to GIF means that some of the information in the original image may be lost, although the loss may not be visible. If you wish to enlarge or resize the image later, you should first save the flattened image as a TIFF file. Later you can convert it to an indexed image and re-save it as a GIF file. You might want to do this when working with web page graphics, for example.
Don’t let all this confuse you. In short, start with these simple steps:
- Create your work of art in the GIMP.
- Save it as an XCF formatted file.
- Flatten the image.
- Save it as a TIFF formatted file.
- Convert the image to indexed format.
- Save it as a GIF formatted file.
At this point you have the original layers information in the XCF file, a full color, high quality image in the TIFF file and an image suitable for use on your web pages in the GIF file. Each of these file formats is a different size. The XCF is the largest; the GIF is the smallest. As you can see, working with images in this way tends to be very disk space intensive.
PhotoCD and Digital Cameras
Support for the PhotoCD format, available from Kodak Digital Cameras, was available in the 0.54 release of the GIMP last year. A quick check of the Plug-In Registry shows that the plug-in has not yet been ported (or at least not registered) for the 1.0 release. If you need this format, you should check with the plug-in author or check the Registry periodically to see if the plug-in has been registered. Note that plug-ins written for the 0.54 or 0.60 releases of the GIMP are not compatible with the 1.0 release. They must be rewritten using the GIMP 1.0 Plug-In API.
Vector Formats
The alternative to raster graphics is vector graphics. There are a wide variety of image file formats that the GIMP supports for raster images, but it does not support any image files that use vector formats. This is only important if you wish to use one of the many ClipArt collections available for Windows systems; these files are often suffixed with .wmf. There are still many CD’s available with image collections in TIFF or JPEG format that can readily be used by the GIMP. If you must have access to the vector ClipArt collections, use Applixware’s Applix Graphics package or perhaps a Windows program to read them in and save them in a raster format such as TIFF, JPEG or GIF.
PNG
An emerging format that has recently gained wide acceptance is called PNG, the Portable Network Graphics format. Earlier releases of the GIMP support this format but, at the time of this writing, the plug-in providing PNG support has not yet been ported to the new 1.0 Plug-In API. I expect this to happen by the time this article is published. Again, check the Plug-In Registry to be certain.
Moving On
We’ve covered a lot of ground but have only managed to open a file—we haven’t done anything useful with it. Don’t despair—we’re getting there. Next month we’ll cover the Image Window in more detail. A detailed discussion on layers will also be presented, which is very important to understanding how to get the most out of the GIMP. We’ll briefly cover how filters work and discuss a few of the more interesting image-processing options available with filters. After that, in the final installment of this series, we’ll cover the Toolbox in complete detail. At that point you’ll have enough background to begin to do something really useful with the tools in the Toolbox.
I realize some readers will wonder why I don’t cover the Toolbox before I cover filters. Well, it has to do with the length of each of these installments. The best way to fit everything into reasonably sized articles is to do the layers and filters section together. Since the Toolbox has so many tools, it will take a very long installment just to give a short introduction to each of them. Stay tuned: in the end, having the information from all four parts will be of benefit as you make the most of what the GIMP has to offer.
 Linux, Linux OS, Free Linux Operating System, Linux India Linux, Linux OS,Free Linux Operating System,Linux India supports Linux users in India, Free Software on Linux OS, Linux India helps to growth Linux OS in India


